Sunday, April 22, 2012

Deep Fried Ranch Mushrooms!


Don't they just look so good?!
They are!
 
 
But as an honest blogger, I'll tell you something. I much would have rather preferred the mushrooms sauteed and then deep fried. Fresh mushrooms just have that "dirt" taste and smell about them.

Ingredients:
1 container of fresh mushrooms
2 cups of flour
1 packet of Hidden Valley Ranch mix
2 cups of fine bread crumbs
4 (-ish) eggs, beaten
 
In a medium sized bowl, combine the flour and ranch mix. Also add any other seasonings you may want to use. I added just a dash of garlic salt. In another medium sized bowl, beat all the eggs. Also have another medium sized bowl with the bread crumbs. This would also be the time to slice the mushrooms if you didn't want them left whole. (Sautee them at this point as well, I would think.)

We set ours up in the order we'd be going. We also had a baking sheet out to place all of the readied mushrooms on before frying. The process of breading the mushrooms didn't take too long, but we started the oil beforehand anyways. Plus, the longer the oil is on and the hotter it gets, the fast the mushrooms fry.


Flour/ranch combo, eggs, bread crumbs.


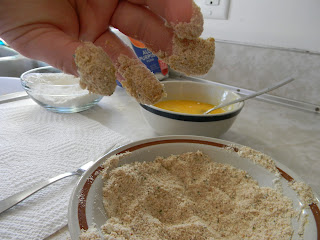
 So you coat the mushroom in the flour/ranch mix first, then roll it around in the eggs. This part was tricky because the eggs really did not want to stick to the flour. So you had to get down and dirty. You couldn't help but get your fingers completely filthy with this mess. 


Then we found that just placing the mushroom in the bowl and then sprinkling/shoveling the bread crumbs onto the mushroom worked better than rolling it around because at this stage, all of the coatings would just slip off from your fingers. 


I told my husband we should just dip his fingers into the fryer. Well, they were coated thicker than the dang mushrooms!


 These three mushrooms turned out really nice. I took my sweet time with them. After this, it all went to hell. My husband and I tag-teamed the breading process and then I fried them while he held the plate with the paper towel.
 

Just about fifteen to twenty seconds of being rolled around in the deep fryer and these babies turned out nice and golden brown. I was rather pleased with them. From my experience, I never really did more than two or three mushrooms at a time. Mostly because I wanted to be able to control the time spent on one side. And they really have a mind of their own when rolling around in there.


This is a mushroom cut in half. You can't REALLY tell but the mushrooms were barely cooked. Hence my reasoning for the mentioning of sauteeing the mushrooms before hand.


Anyways. If you want something different to add to a dinner menu, these would be it. I'd tweak the recipe a bit to compliment whatever else was being offered, but still eat them on their own as well. My six year old couldn't get enough of them. :]
 
-Erin

Ideas.

My husband and I have so many projects planned, it's almost pathetic. But the weather REALLY isn't cooperating. Neither are the paychecks.

So while everything project-wise is on the back burner, we just have our daily chores, work, school, and family time. And by family time, I mean us all being in the same room...not actually doing anything together really. We need to work on that...soon.

Being a "successful" blogger requires a lot of things, most of which I do not possess. I find a plethora of blogs that I get lost on, constantly opening new tabs with new pages. I literally get lost. Sometimes, and I hate to admit this, I get so....jealous...that I get mad. THAT is pathetic. But then it also motivates me.

My next (simple) project will be making some homemade play dough for the girls. It will happen either tonight or tomorrow morning. But I think it's time for our sweet Claire to experience the joy of play dough. :]

-Erin

Wednesday, April 11, 2012

Homemade Jolly Rancher Lollipops!


So I pretty much decided I'd make these today.
I've been talking and talking about it ever since I first saw the idea. But between work, the girls, the dogs, my husband's college courses, and every other little thing in between...I've not had time.

But today, despite feeling crappy, I made these wonderful lollipops.
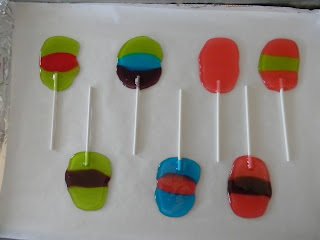
Just looking at them makes me smile. The colors are so great together and when the light shines through them it's just like heaven. Or...close enough.


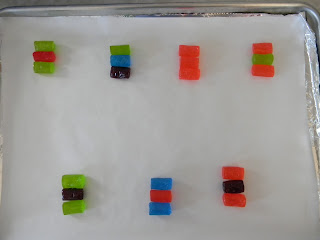
So you just pick which flavors you want per lollipop. I went the extra bit and organized each flavor into a group and counted them. That way, I knew how many I had for each layer of a lollipop. OCD? A bit...but that's okay! Right?

Take any size baking sheet and cover it will aluminum foil and then add a layer of parchment paper on top of that. I guess this is to make sure the ranchers don't melt too fast and then the parchment paper is for easy removal. I didn't want to not do it that way and totally screw it up. You know?

Here, have another picture of my jolly ranchers all lined up. :]


 The most sets that I put on the sheet at once was seven. Make a zigzag pattern so that when it is time to insert the lollipop stick, the open side of the stick will not touch a different lollipop.

Once you have the lollipops outlined like so, in the oven they go! 
 I have an electric oven that I set at 270 degrees fahrenheit. Once the oven was preheated, I still waited a few minutes to get the oven to optimum prime. (Like my Transformers pun?)


I turned my timer on for five minutes at first. Once I checked, the outline of the ranchers were just beginning to melt. So I just stood there and watched it, counting the minutes. I had a small audience. :]


After an estimated eight to nine total minutes, I figured then was a good of time as any to remove the cookie sheet and insert the lollipop sticks right away. Because I'm a sucker for organization and preparedness, I already had my sticks counted out and on the counter, ready to go.

And let me tell you, to no exaggeration, that before I had even gotten to my third set of ranchers, they were already slightly sticky and harder to coat the stick with. But. I was all sorts of excited and managed to take my time to insert the sticks in each lollipop. And rather straight, I might add!!

(Don't worry, the all pink one was meant to be
like that. It's not as cute, though.)

On another note, the post I made to my personal facebook about these was covered with the idea of the lollipops with the green on the top and bottom looking like TMNT. How cute would that be for a birthday themed party or something?!


Anyways. I just ended up wrapping these lollipops in cling wrap and used a twist tie for closure reinforcement. For a party or gathering, I would still use cling wrap but probably just measure it out more so the ends look nice and use a type or ribbon or yarn. Or pretty colored twist ties if I could find them.

Like I said, they're just really cute. :]


-Erin 


Thursday, April 5, 2012

Honesty.

I've been aiding my husband in his HTML/CSS class for his final project. He's making a mock website for me.:]

I'm learning a lot and I've learned that I REALLY want my own website/blog. I've been interested, but not ready to make any other commitments. Marriage and moving my life across the United States was enough for me. But I do want to be able to dedicate so much time in each day to make that website/blog great. So in the spirit of bettering myself, I've decided to full-on learn time management! Yay!

Along with time management comes a plethora of other adult-y, grown-up, responsible things. I think it's high time that I start for real being a mother and wife. I've been slacking lately, to put it modestly. 


And you know how you get just really excited about something and you do so great to begin with and then sooner, rather than later, you notice that you've completely fallen off of the bandwagon again.


Yeah. Exactly.


But hopefully, this time management crap will help.


(I sound so confident...don't I?!)

-Erin