Saturday, March 31, 2012

Frosting (A Product[s] Review)!


Okay, folks! Duncan Hines first, since it was my favorite...even after the cons.

So, I was sooo excited about this product. All of those flavors and the convenience of it all. Oh my stars, I was in love. For my first one, I tried the cotton candy flavor. Why? Well,it seemed the most...original?

The flavor was great. It wasn't too sweet or overpowering. The scent was equally sweet. It took me back to my childhood of carnivals and festivals, eating cotton candy til I could eat no more.

I baked a quick cake and decorated it with the frosting, using it for the filling as well. I was so sloppy with the "decorating" and just really didn't care.

 See?!

But it isn't all my fault! The frosting got very warm, rather quickly. It's pretty runny. Yeah, the "decorating" stayed in it's place...but it definitely wasn't ideal for decorating a cake.

But. I did a couple of cupcakes, just playing around. I found that I didn't properly combine all of the frosting and mix. But. It turned out kind of cute?


Heh.

Lesson learned: simple idea, easy to use, but would only be used as filling or in small dosages...like on cupcakes!


Next:
I picked these up from Wal Mart one day, just thought the packaging was cute...to be honest. :]

I tried them anyways. I made the cookie sandwiches like suggested on the back (or side...whatever) of the box. Not too sweet or tart. And I only baked the cookies for about 8 minutes. Let the sit to firm and then move to a rack to cool. I let my last batch stay in the suggested time and they had a brown tinge to them. Uuuuugly.

[The cookies on the very bottom were from the last batch.]

From the small amounts of the pink lemonade frosting that were used, it wasn't bad. I wouldn't put it past me to frost an entire cake with it. :]


The kids loved them, that's all that matters to me.

Saturday, March 24, 2012

...crafts!

My mind is going absolutely crazy with craft ideas. And I sure can't just write them all down, it'll never make sense!

Please tell me you know what I'm talking about?! That feeling of overwhelming desire to just pull everything out and craft all day, but you know darn well that you can't do that. So your brain is then working overtime, trying to organize and make sense of all of the things in your brain. Then you have all of your other umpteen million responsibilities and then just feel like you'll never be able to craft again.

I just hate this phase.

-Erin

Thursday, March 22, 2012

Homemade Lasagna!

My lasagna is the one thing I can make and literally everyone cannot get enough. I haven't made it in...a long time. It's very filling. But I do hope to make it again soon so that I can post it here for you. If you, or anyone you love (and love to cook for), loves pasta...this is the meal for you. I'll post an update of when I know it'll be made. Just stick around!

-Erin

Homemade Apple Pie!

This lovely creation was my first ever homemade apple pie.

Now let me tell you something about this pie. It was the EASIEST thing I have ever baked, in my life. You think muffins are easy? No. This pie. It was.

So I started out with six granny smith apples. Peel them, core them, dice them. Some people like to slice the apples, but I like the whole idea of "bite-size" due to the fact that I'm always feeding children. So I diced my apples.
Once all of your apples are diced, stick them in a medium to large sized bowl, rinse under ice cold water. Okay, so you don't have to actually put ice in the ice cold water, but just as cold as you can possibly get.
Drain the apples as best you can, then add however much cinnamon and sugar...to taste. I've heard of brown sugar, vanilla sugar, etc., being used. That's fine, too. Just, whatever your heart desires. Keep in mind, the juices will settle and, chances are, so will the spices. But it really makes the apple pie so much better.

So, I lied when I said "homemade". It's not COMPLETELY homemade. It's semi-homemade. I'm Sandra Lee. I used a store-bought pie crust. I kept it in the freezer until right when I needed it. Pull that baby out and then pour all of your diced apples, juices, and spices into it. I actually took the time to rearrange the diced apples so that the area of the pie was mostly even. Think of it as a puzzle!
 It should look something like this.
Hopefully?
Or better, even.

I set that almost-ready pie in the fridge while I prepared the crumb topping. This crumb topping 'tis tricky (say that 5x fast). It's pretty much to preference/taste. It's just flour and butter. Room temperature butter works best, but I've been known to be impatient. So my crumbing took a lot longer. Don't use a mixer or anything. Just a good ole' rubber spatula against the flour/butter in a plastic mixing bowl. I also added just a bit of sugar. Then more flour, then more butter, then more of all of it again.
Just to make sure I had enough crumb. I think all in all, I ended up using like 4 cups of flour, a stick and a half of unsalted butter, and 2 cups of sugar. I'm not sure. This was like, two years ago.
Then I took the other half of the stick of butter and thinly sliced butter over the crumbs on the pie (that I had removed from the fridge and poured the crumbs onto, yeah).
Sprinkle some more sugar on top (!!!!).

[Sorry I didn't take a picture at this point!]
 
Prepare a baking sheet with a generous layer of aluminum foil then place the pie in the middle. Pop it in the oven that is at the heat of 350degrees. Time it for about 10 minutes, then go from there. I'm telling you, apple pie-making is not an exact science. It's definitely more experimental!
When the pie crust and crumb start browning, I'd stick a fork through the middle and see if the apples were cooked through or not (they'd be easily speared). If the crust and crumbs are browning but the apples are not cooked-through, roll the aluminum foil up around the pie, careful not to actually touch it. Then it's really touch-and-go.

See that gooey-ness? Oh my stars, it's the best part!
It's from everything settling. Mmm.

Sorry if this was hard to follow, I never made apple pies from a recipe but rather from memory...much like I typed this out. :]
Enjoy!

-Erin

Wednesday, March 21, 2012

Easter Eggs!

Alrighty. I'm going to attempt to give y'all a tutorial?
Yeah, I'm not so sure.

But, here goes.

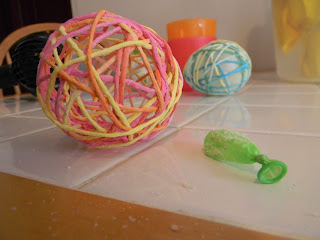
So everyone who is stalking pinterest and loving holiday crafts as much as myself, has probably seen a dozen of these wrapped yarn/thread/rope/lace Easter eggs. I decided to try it myself, thinking it'd be so fun to do with the kiddos. Right? I mean, messy liquid starch and yards and yards of yarn to play with in the messy liquid starch? Yeah, totally makes sense.
Not so much.

My generous husband offered to help me with this project, and thank the good Lord he did because I would have had a mental break down. Yeah, I'm sensitive. 

I used one cup of Sta-Flo liquid starch, found at my friendly local Wal-Mart, plus a half cup of flour. I honestly think it'd be fine without the flour, but it seemed to give the liquid more of a thickness. I'll come back to this.
My husband unraveled the yarn and placed, foot by foot, a round of yarn into my bowl of starch/flour. I had a water balloon, blown up and not fully expanded (and tied off, obviously), in one hand...ready to go. Now, the technique will differ with each person. I somehow managed to hold the balloon in my left hand, plus hold the end of the yarn in my left fingers to use my right hand to siphon off the excess mixture from my yarn to then attempt to wrap the balloon using both hands. That yarn was pretty darn slippery on the balloon. It was an interesting first few wraps...on each balloon. 
Anyways. 
You just keeps wrapping, in all sorts of different directions and areas of the balloon, making sure that you don't forget to put your yarn in the starch.flour mixture. Yeah, I kept going. Without dipping. Thank God my husband was there. 
Wrap until you feel the egg has enough girth. I had my husband cut off the yarn and then I just slid the end under a few of the wraps. Ideally, the balloons should be hung up on a rope/ribbon/wire/whatever with some sort of clip on the tie so that the eggs can drip/air-dry. Did I do that? 
Nope. I set them in plastic cups overnight.
 The next morning when I checked, the tops were stiff and dry. Everywhere else, pretty much freshly dipped. So I turned them upside down. Did that work? Nope. So I sat down, with my heat gun (aka my good ol' hair dryer) and individually blow dried each balloon. It took for-ev-er.
The pink/orange/yellow egg was my favorite, at that time, so it dried first. I pinched a hole in the balloon with my scissors and watched the balloon deflate, cracking and dropping starch/flour dandruff everywhere. It was an interesting experience. 
I think I'll come back to the whole using a mix of starch and flour here. Although the flour gave the mixture a thickness and whatnot, it also gave it clumps. If you think you may want to try this mixture, I'd suggest pouring the starch into the bowl, then sifting the flour over it. Live and learn, yeah?
That string was being really stubborn. So I pulled it out and cut it off. I wasn't taking any crap from anything.
Excuse my sink. and crappy lighting. I found the smallest holes, that I could still fit my ribbon through, and just strung the eggs that way. One of the many tutorials that I read had used thinner, colored string and then hot glued it all together. I like the whole "not being glued to each other" thing because then I can rearrange the eggs, depending on what they're hanging on.

The purple/yellow/white is my favorite now. :]


Tuesday, March 20, 2012

So I've decided to start this blog so that I could post all of the wonderful ideas in a range of categories that I attempt. And although I've been rather crafty, organized, inspired, and generally craft-like my entire life, I've recently decided to really get my hands dirty with these things.

As I become more well-rounded with this whole html thing (aka my husband or sister-in-law doing it for me), I'm sure my blogging experience and your reading experience will turn out rather great.

Until then, please please please stick with me?!
 
-Erin