Tuesday, October 2, 2012

Homemade Lasagna (finally)!

I'm going to try to ignore the fact that I haven't posted since May. Can you? For me...please?

I'm going to do a quick post (to make myself feel better) on how I make my lasagna. I cheat a bit.


So we'll need:
1 16oz tub of cottage cheese
1 16oz tub of ricotta cheese
1 egg
1lb to 2lb hamburger (I try to use 97%)
1 26oz jar of preferred spaghetti sauce in preferred flavor
1 box of no boiling required (oven ready) lasagne noodles
2 to 3 8oz bags of shredded cheese in preferred flavor
Salt and pepper to taste

Hmm, I think that covers everything. We'll see.

Set your oven to 425F.

So, start out by cooking your hamburger. You can broil it or fry it up in a pan. We've always plopped the hamburger right into a pan, pulled it all apart with a spatula, seasoned it (we use Lawry's seasoning salt with some garlic salt) then added a lid to the pan and cooked the meat over medium heat.

While the hamburger is sizzling in the pan, mix your cottage and ricotta cheese in a large mixing bowl. Add your egg, salt and pepper and continue to mix. The egg helps the cheeses stay together as your lasagna is baking...little tip I took from my sister.

Because the noodles do not have to be boiled, it cuts the prep time in half. These no-boil noodles are the best things invented. They're still just as soft and noodle-y because they soak up the moisture from everything else.

Once your hamburger is done, drain it as much as possible. When that's done, add in your spaghetti sauce and cook it over low heat to warm the sauce up to the hamburger. Here is also where you would add any additional seasoning, making sure to get a great marriage of flavors and smells.

While that is getting to a simmer, pick out the baking dish you'll be using. I like using the clear glass because you can see all of the ingredients cooking together, layer by layer.


So by now, I'll have my bowl of cheeses, bowl of meat/spaghetti sauce, and box of noodles out on the counter. I'll have opened my bags of shredded cheeses, ready to be used. I do it this way (dirtying up all these dishes) because I have limited counter space. This way, all of my things are right there together and I can access them each quickly to make my layers.


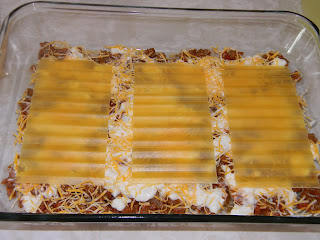
Start layering the ingredients:
Hamburger 
Cottage/ricotta cheeses
Shredded cheeses
Noodles


So obviously I never put too much shredded cheese in the layers because I wanted it all for the top. I'm greedy like that.

Pop that in the oven for anywhere between 30 minutes and 45 minutes, depending.

It should come out looking like this:


We love the crunch of the cheese. It's fabulous.

Serve this with homemade garlic bread and cheese sauce, it's sure to become a family favorite!


-Erin

Tuesday, May 8, 2012

Burlap Wreath!


 So I made this wreath a few months ago, it was my first project I'd tried in a while and actually my first wreath. I love all things burlap and a wreath just seemed like a perfect accent piece to our front door.


I searched and searched pinterest and other blogs I personally follow for their means of making a wreath. I finally decided on a wire wreath from from Jo Ann's and tied the burlap strips around the wire form.


I really didn't know if I wanted to tie around all four wire circles or just three, but when I tried it any other way, it just look funny to me. So I ended up tying around all four, starting with the wiring that attached all four circles. Then I crammed as many tied burlap straps between the previous ones as I could.


My burlap strips were approximately two inches wide and eight to 10 inches long. They weren't all cut perfectly at the same exact size for, you know, like...authenticity. Or whatever.

I also had to decide which section was going to be the top for my wreath hook to sit. That was fun. I want everything to look symmetrical, so making sure I picked a good spot was important. Laugh all you want!

Once the burlap was all on and the ends were sitting like I wanted, I also had to decide where my fabric rosettes were going. Again, symmetrical and whatnot.


These fabric rosettes were made from some scrap fabric. A friend of mine gave me the green/gray colored fabric and the orange is from an old maternity shirt. It's hard to tell by the picture, but the orange is actually white and orange striped. Don't ask why I had a white and orange striped maternity shirt.

I used brown construction paper as a base for my rosettes. I glued the end of the fabric down with my hot glue gun. Once that was set, I twisted the fabric and then hot glued the fabric to itself and the construction paper and let that set. Once to the end, I made sure that was glued down really well.

I also used alligator clips for the rosettes. I glued the flat part of the alligator clip to the construction paper, let it set. Then I just use the clip to attach to a knot in the burlap.

Now, let me tell you. As cute as this thing was, and yes I mean WAS, it just made me so mad. The hot glue didn't keep the alligator clips attached to the construction paper to keep the rosettes on the wreath. Currently, there is just this sun-stained ugly burlap flopping around on what is considered a wreath on my front door.

I'll fix it eventually.


-Erin

Tuesday, May 1, 2012

Homemade Playdough!

I have always steered clear of playdough. I'm not sure why, seeing as I absolutely loved it as a child. I loved when my mama would just set me loose in the kitchen and on the table with a flour/water mixture and all of the cookie cutters in sight. Favorite past time as a five year old. Ever.

So although I'm a bit late on this, I made some for the girls. I looked and looked at recipes online until my eyes couldn't take it anymore. After seeing that this recipe had such great success and was pinned and repinned on Pinterest, I decided on it. And, well, I just am in love with adelynSTONE and everything that it entails!


 Ingredients:

 1 cup flour
1 cup water
1/4 cup salt
1 tbsp vegetable oil
(I used safflower oil)
2 tsp cream of tartar
Food coloring
(I only had neon)


Here comes the tricky part:
Mix all of the ingredients together, warm over medium heat on the stove, stirring as you go. When the dough starts to form, remove from heat and knead by hand.

That's it. That's all there is to it.
But I hate that it's so simple, so I'm going to break it down for you. Not that you can't figure it out, but because I like to be thorough. :]


This is Miss Claire. I had her help me a bit before sending her pretty little head to bed. I just want to pinch her cheeeeeeks.

Back to the recipe, though.

You can add the ingredients in any order, I always tend to mix my dry ingredients and then add a wet, mix, then add the next wet ingredient, etc. Baker at heart, you know. Once the ingredients are well mixed with minimal clumps, I added my food coloring.


 Claire couldn't stop giggling, then gasping, then acting scared. She really had every range of emotion during this. She just wasn't sure. After the dough was done, it took her about thirty minutes of sitting with me next to her with the dough for her to touch it. It was a funny experience.

Mix the colors thoroughly and then move the pot over to the stove. I used a larger stove eye for more coverage of the bottom of the pot. Who knows if it makes a difference. That's just the way my mind works.


 Don't stop stirring. Not even to take a picture. Have someone else there. Because when I stopped for a photo op, this is what happened:


And so I panicked! I didn't want it to burn! But, of course, I had used my old crappy pot. So it was bound to happen anyways. So I just worked quickly to scrape the bottom and the sides, making sure to mold the dough together a bit.


Once formed and there were no liquid-y parts, I plopped the dough out onto my counter. It looks rather ugly at this point. Not very desirable. 


I kneaded like my life depended on it. Why? Because it was hot! Although it felt good at first, it became way too hot. I looked like a crazy person trying to knead this hot dough.


 See my poor hand! It was a rather interesting experience, I'll tell ya that much. It was somewhat therapeutic. Like the whole hot stones on your back thing. I'm guessing it's like that. I wouldn't know. (Hint hint, husband...)


Over at adelynSTONE, KristanLynn used baby food jars to store the dough. I used color coordinated plastic kids' storage. Go figure.

We have our playdough sitting in our hall closet, hidden by our tower of towels. We have a very sneaky six year old and I wouldn't put it past her to find it and play with it in the mornings before we get out of bed. So. Hidden, it is.

P.S. I know there was mention of glitter over at adelynSTONE but glitter and my husband just do NOT get along. :]


-Erin

Sunday, April 22, 2012

Deep Fried Ranch Mushrooms!


Don't they just look so good?!
They are!
 
 
But as an honest blogger, I'll tell you something. I much would have rather preferred the mushrooms sauteed and then deep fried. Fresh mushrooms just have that "dirt" taste and smell about them.

Ingredients:
1 container of fresh mushrooms
2 cups of flour
1 packet of Hidden Valley Ranch mix
2 cups of fine bread crumbs
4 (-ish) eggs, beaten
 
In a medium sized bowl, combine the flour and ranch mix. Also add any other seasonings you may want to use. I added just a dash of garlic salt. In another medium sized bowl, beat all the eggs. Also have another medium sized bowl with the bread crumbs. This would also be the time to slice the mushrooms if you didn't want them left whole. (Sautee them at this point as well, I would think.)

We set ours up in the order we'd be going. We also had a baking sheet out to place all of the readied mushrooms on before frying. The process of breading the mushrooms didn't take too long, but we started the oil beforehand anyways. Plus, the longer the oil is on and the hotter it gets, the fast the mushrooms fry.


Flour/ranch combo, eggs, bread crumbs.


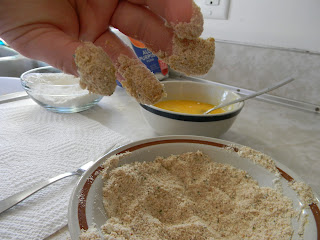
 So you coat the mushroom in the flour/ranch mix first, then roll it around in the eggs. This part was tricky because the eggs really did not want to stick to the flour. So you had to get down and dirty. You couldn't help but get your fingers completely filthy with this mess. 


Then we found that just placing the mushroom in the bowl and then sprinkling/shoveling the bread crumbs onto the mushroom worked better than rolling it around because at this stage, all of the coatings would just slip off from your fingers. 


I told my husband we should just dip his fingers into the fryer. Well, they were coated thicker than the dang mushrooms!


 These three mushrooms turned out really nice. I took my sweet time with them. After this, it all went to hell. My husband and I tag-teamed the breading process and then I fried them while he held the plate with the paper towel.
 

Just about fifteen to twenty seconds of being rolled around in the deep fryer and these babies turned out nice and golden brown. I was rather pleased with them. From my experience, I never really did more than two or three mushrooms at a time. Mostly because I wanted to be able to control the time spent on one side. And they really have a mind of their own when rolling around in there.


This is a mushroom cut in half. You can't REALLY tell but the mushrooms were barely cooked. Hence my reasoning for the mentioning of sauteeing the mushrooms before hand.


Anyways. If you want something different to add to a dinner menu, these would be it. I'd tweak the recipe a bit to compliment whatever else was being offered, but still eat them on their own as well. My six year old couldn't get enough of them. :]
 
-Erin

Ideas.

My husband and I have so many projects planned, it's almost pathetic. But the weather REALLY isn't cooperating. Neither are the paychecks.

So while everything project-wise is on the back burner, we just have our daily chores, work, school, and family time. And by family time, I mean us all being in the same room...not actually doing anything together really. We need to work on that...soon.

Being a "successful" blogger requires a lot of things, most of which I do not possess. I find a plethora of blogs that I get lost on, constantly opening new tabs with new pages. I literally get lost. Sometimes, and I hate to admit this, I get so....jealous...that I get mad. THAT is pathetic. But then it also motivates me.

My next (simple) project will be making some homemade play dough for the girls. It will happen either tonight or tomorrow morning. But I think it's time for our sweet Claire to experience the joy of play dough. :]

-Erin

Wednesday, April 11, 2012

Homemade Jolly Rancher Lollipops!


So I pretty much decided I'd make these today.
I've been talking and talking about it ever since I first saw the idea. But between work, the girls, the dogs, my husband's college courses, and every other little thing in between...I've not had time.

But today, despite feeling crappy, I made these wonderful lollipops.
Just looking at them makes me smile. The colors are so great together and when the light shines through them it's just like heaven. Or...close enough.


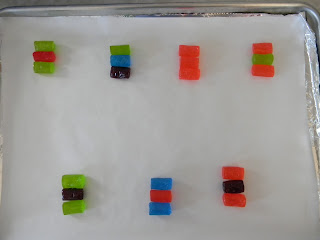
So you just pick which flavors you want per lollipop. I went the extra bit and organized each flavor into a group and counted them. That way, I knew how many I had for each layer of a lollipop. OCD? A bit...but that's okay! Right?

Take any size baking sheet and cover it will aluminum foil and then add a layer of parchment paper on top of that. I guess this is to make sure the ranchers don't melt too fast and then the parchment paper is for easy removal. I didn't want to not do it that way and totally screw it up. You know?

Here, have another picture of my jolly ranchers all lined up. :]


 The most sets that I put on the sheet at once was seven. Make a zigzag pattern so that when it is time to insert the lollipop stick, the open side of the stick will not touch a different lollipop.

Once you have the lollipops outlined like so, in the oven they go! 
 I have an electric oven that I set at 270 degrees fahrenheit. Once the oven was preheated, I still waited a few minutes to get the oven to optimum prime. (Like my Transformers pun?)


I turned my timer on for five minutes at first. Once I checked, the outline of the ranchers were just beginning to melt. So I just stood there and watched it, counting the minutes. I had a small audience. :]


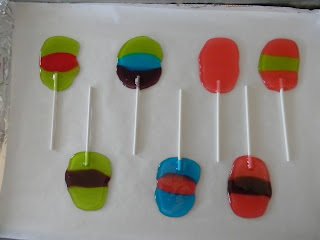
After an estimated eight to nine total minutes, I figured then was a good of time as any to remove the cookie sheet and insert the lollipop sticks right away. Because I'm a sucker for organization and preparedness, I already had my sticks counted out and on the counter, ready to go.

And let me tell you, to no exaggeration, that before I had even gotten to my third set of ranchers, they were already slightly sticky and harder to coat the stick with. But. I was all sorts of excited and managed to take my time to insert the sticks in each lollipop. And rather straight, I might add!!

(Don't worry, the all pink one was meant to be
like that. It's not as cute, though.)

On another note, the post I made to my personal facebook about these was covered with the idea of the lollipops with the green on the top and bottom looking like TMNT. How cute would that be for a birthday themed party or something?!


Anyways. I just ended up wrapping these lollipops in cling wrap and used a twist tie for closure reinforcement. For a party or gathering, I would still use cling wrap but probably just measure it out more so the ends look nice and use a type or ribbon or yarn. Or pretty colored twist ties if I could find them.

Like I said, they're just really cute. :]


-Erin 


Thursday, April 5, 2012

Honesty.

I've been aiding my husband in his HTML/CSS class for his final project. He's making a mock website for me.:]

I'm learning a lot and I've learned that I REALLY want my own website/blog. I've been interested, but not ready to make any other commitments. Marriage and moving my life across the United States was enough for me. But I do want to be able to dedicate so much time in each day to make that website/blog great. So in the spirit of bettering myself, I've decided to full-on learn time management! Yay!

Along with time management comes a plethora of other adult-y, grown-up, responsible things. I think it's high time that I start for real being a mother and wife. I've been slacking lately, to put it modestly. 


And you know how you get just really excited about something and you do so great to begin with and then sooner, rather than later, you notice that you've completely fallen off of the bandwagon again.


Yeah. Exactly.


But hopefully, this time management crap will help.


(I sound so confident...don't I?!)

-Erin

Saturday, March 31, 2012

Frosting (A Product[s] Review)!


Okay, folks! Duncan Hines first, since it was my favorite...even after the cons.

So, I was sooo excited about this product. All of those flavors and the convenience of it all. Oh my stars, I was in love. For my first one, I tried the cotton candy flavor. Why? Well,it seemed the most...original?

The flavor was great. It wasn't too sweet or overpowering. The scent was equally sweet. It took me back to my childhood of carnivals and festivals, eating cotton candy til I could eat no more.

I baked a quick cake and decorated it with the frosting, using it for the filling as well. I was so sloppy with the "decorating" and just really didn't care.

 See?!

But it isn't all my fault! The frosting got very warm, rather quickly. It's pretty runny. Yeah, the "decorating" stayed in it's place...but it definitely wasn't ideal for decorating a cake.

But. I did a couple of cupcakes, just playing around. I found that I didn't properly combine all of the frosting and mix. But. It turned out kind of cute?


Heh.

Lesson learned: simple idea, easy to use, but would only be used as filling or in small dosages...like on cupcakes!


Next:
I picked these up from Wal Mart one day, just thought the packaging was cute...to be honest. :]

I tried them anyways. I made the cookie sandwiches like suggested on the back (or side...whatever) of the box. Not too sweet or tart. And I only baked the cookies for about 8 minutes. Let the sit to firm and then move to a rack to cool. I let my last batch stay in the suggested time and they had a brown tinge to them. Uuuuugly.

[The cookies on the very bottom were from the last batch.]

From the small amounts of the pink lemonade frosting that were used, it wasn't bad. I wouldn't put it past me to frost an entire cake with it. :]


The kids loved them, that's all that matters to me.

Saturday, March 24, 2012

...crafts!

My mind is going absolutely crazy with craft ideas. And I sure can't just write them all down, it'll never make sense!

Please tell me you know what I'm talking about?! That feeling of overwhelming desire to just pull everything out and craft all day, but you know darn well that you can't do that. So your brain is then working overtime, trying to organize and make sense of all of the things in your brain. Then you have all of your other umpteen million responsibilities and then just feel like you'll never be able to craft again.

I just hate this phase.

-Erin

Thursday, March 22, 2012

Homemade Lasagna!

My lasagna is the one thing I can make and literally everyone cannot get enough. I haven't made it in...a long time. It's very filling. But I do hope to make it again soon so that I can post it here for you. If you, or anyone you love (and love to cook for), loves pasta...this is the meal for you. I'll post an update of when I know it'll be made. Just stick around!

-Erin

Homemade Apple Pie!

This lovely creation was my first ever homemade apple pie.

Now let me tell you something about this pie. It was the EASIEST thing I have ever baked, in my life. You think muffins are easy? No. This pie. It was.

So I started out with six granny smith apples. Peel them, core them, dice them. Some people like to slice the apples, but I like the whole idea of "bite-size" due to the fact that I'm always feeding children. So I diced my apples.
Once all of your apples are diced, stick them in a medium to large sized bowl, rinse under ice cold water. Okay, so you don't have to actually put ice in the ice cold water, but just as cold as you can possibly get.
Drain the apples as best you can, then add however much cinnamon and sugar...to taste. I've heard of brown sugar, vanilla sugar, etc., being used. That's fine, too. Just, whatever your heart desires. Keep in mind, the juices will settle and, chances are, so will the spices. But it really makes the apple pie so much better.

So, I lied when I said "homemade". It's not COMPLETELY homemade. It's semi-homemade. I'm Sandra Lee. I used a store-bought pie crust. I kept it in the freezer until right when I needed it. Pull that baby out and then pour all of your diced apples, juices, and spices into it. I actually took the time to rearrange the diced apples so that the area of the pie was mostly even. Think of it as a puzzle!
 It should look something like this.
Hopefully?
Or better, even.

I set that almost-ready pie in the fridge while I prepared the crumb topping. This crumb topping 'tis tricky (say that 5x fast). It's pretty much to preference/taste. It's just flour and butter. Room temperature butter works best, but I've been known to be impatient. So my crumbing took a lot longer. Don't use a mixer or anything. Just a good ole' rubber spatula against the flour/butter in a plastic mixing bowl. I also added just a bit of sugar. Then more flour, then more butter, then more of all of it again.
Just to make sure I had enough crumb. I think all in all, I ended up using like 4 cups of flour, a stick and a half of unsalted butter, and 2 cups of sugar. I'm not sure. This was like, two years ago.
Then I took the other half of the stick of butter and thinly sliced butter over the crumbs on the pie (that I had removed from the fridge and poured the crumbs onto, yeah).
Sprinkle some more sugar on top (!!!!).

[Sorry I didn't take a picture at this point!]
 
Prepare a baking sheet with a generous layer of aluminum foil then place the pie in the middle. Pop it in the oven that is at the heat of 350degrees. Time it for about 10 minutes, then go from there. I'm telling you, apple pie-making is not an exact science. It's definitely more experimental!
When the pie crust and crumb start browning, I'd stick a fork through the middle and see if the apples were cooked through or not (they'd be easily speared). If the crust and crumbs are browning but the apples are not cooked-through, roll the aluminum foil up around the pie, careful not to actually touch it. Then it's really touch-and-go.

See that gooey-ness? Oh my stars, it's the best part!
It's from everything settling. Mmm.

Sorry if this was hard to follow, I never made apple pies from a recipe but rather from memory...much like I typed this out. :]
Enjoy!

-Erin

Wednesday, March 21, 2012

Easter Eggs!

Alrighty. I'm going to attempt to give y'all a tutorial?
Yeah, I'm not so sure.

But, here goes.

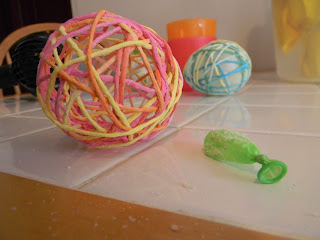
So everyone who is stalking pinterest and loving holiday crafts as much as myself, has probably seen a dozen of these wrapped yarn/thread/rope/lace Easter eggs. I decided to try it myself, thinking it'd be so fun to do with the kiddos. Right? I mean, messy liquid starch and yards and yards of yarn to play with in the messy liquid starch? Yeah, totally makes sense.
Not so much.

My generous husband offered to help me with this project, and thank the good Lord he did because I would have had a mental break down. Yeah, I'm sensitive. 

I used one cup of Sta-Flo liquid starch, found at my friendly local Wal-Mart, plus a half cup of flour. I honestly think it'd be fine without the flour, but it seemed to give the liquid more of a thickness. I'll come back to this.
My husband unraveled the yarn and placed, foot by foot, a round of yarn into my bowl of starch/flour. I had a water balloon, blown up and not fully expanded (and tied off, obviously), in one hand...ready to go. Now, the technique will differ with each person. I somehow managed to hold the balloon in my left hand, plus hold the end of the yarn in my left fingers to use my right hand to siphon off the excess mixture from my yarn to then attempt to wrap the balloon using both hands. That yarn was pretty darn slippery on the balloon. It was an interesting first few wraps...on each balloon. 
Anyways. 
You just keeps wrapping, in all sorts of different directions and areas of the balloon, making sure that you don't forget to put your yarn in the starch.flour mixture. Yeah, I kept going. Without dipping. Thank God my husband was there. 
Wrap until you feel the egg has enough girth. I had my husband cut off the yarn and then I just slid the end under a few of the wraps. Ideally, the balloons should be hung up on a rope/ribbon/wire/whatever with some sort of clip on the tie so that the eggs can drip/air-dry. Did I do that? 
Nope. I set them in plastic cups overnight.
 The next morning when I checked, the tops were stiff and dry. Everywhere else, pretty much freshly dipped. So I turned them upside down. Did that work? Nope. So I sat down, with my heat gun (aka my good ol' hair dryer) and individually blow dried each balloon. It took for-ev-er.
The pink/orange/yellow egg was my favorite, at that time, so it dried first. I pinched a hole in the balloon with my scissors and watched the balloon deflate, cracking and dropping starch/flour dandruff everywhere. It was an interesting experience. 
I think I'll come back to the whole using a mix of starch and flour here. Although the flour gave the mixture a thickness and whatnot, it also gave it clumps. If you think you may want to try this mixture, I'd suggest pouring the starch into the bowl, then sifting the flour over it. Live and learn, yeah?
That string was being really stubborn. So I pulled it out and cut it off. I wasn't taking any crap from anything.
Excuse my sink. and crappy lighting. I found the smallest holes, that I could still fit my ribbon through, and just strung the eggs that way. One of the many tutorials that I read had used thinner, colored string and then hot glued it all together. I like the whole "not being glued to each other" thing because then I can rearrange the eggs, depending on what they're hanging on.

The purple/yellow/white is my favorite now. :]